
Video editing is no longer just about cutting clips together—it’s about personality, creativity, and fun. With platforms like TikTok, YouTube Shorts, and Instagram Reels dominating online content, creators are always searching for ways to stand out. One tool that can instantly add humor, character, and uniqueness to your videos is the CapCut Voice Changer feature.
CapCut, a free and beginner-friendly desktop and mobile video editor, includes a variety of editing tools to help you tell stories more creatively. Among its most entertaining features is the Voice Changer, which enables you to transform your voice into various characters, moods, or tones. Whether you want to sound like a robot, a chipmunk, or a deeper version of yourself, this feature can make your videos engaging and memorable.

Why Use the CapCut Voice Changer Feature?
Before diving into the steps, let’s look at why this tool is worth using in the first place:
Add Humor and Entertainment
Voice changes can make ordinary clips funny. Imagine telling a simple story, but instead of your regular voice, it’s narrated in a cartoon-like, high-pitched tone. This simple tweak can boost engagement and increase the likelihood of people sharing your content.
Create Characters and Narratives
If you’re producing skits, animations, or even game clips, different voices help bring characters to life. Instead of hiring multiple people to record, you can easily switch your voice tone within CapCut.
Make Content More Relatable
Viewers enjoy content that feels lighthearted and fun. Adding a playful voice effect makes your video more approachable and less serious, perfect for social platforms.
Boost Engagement on Social Media
Studies show that videos with humor, unique sound effects, or creative twists hold attention longer. A video that uses voice-changing tools is more likely to stop someone mid-scroll.
How to Use the CapCut Voice Changer Feature for Fun and Creative Videos
CapCut Desktop Video Editing Software makes using the Voice Changer feature very simple. You don’t need to be a professional editor or spend hours figuring out settings. Just follow these three steps:
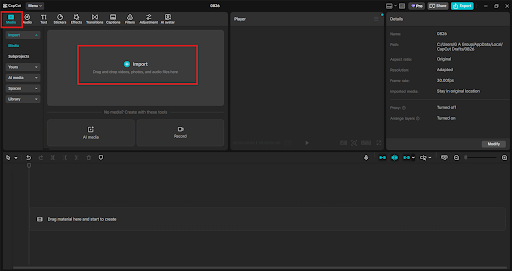
Step 1: Import or Record Your Video
First, open CapCut Desktop and create a new project. From here, you can either:
- Upload a pre-recorded video from your device. This works well if you already have footage you want to edit.
- Record directly in CapCut. If you’re going to create something fresh, you can record your voice or video inside the app.
After importing, drag your clip to the timeline so you’re ready to edit. If you’re planning a skit or voiceover, record your lines in your normal voice first. This gives you a clear base to apply effects later. You can use CapCut Online Photo Editor to enhance your photo content, which you may later use in your video.
Step 2: Apply the Voice Changer Effect
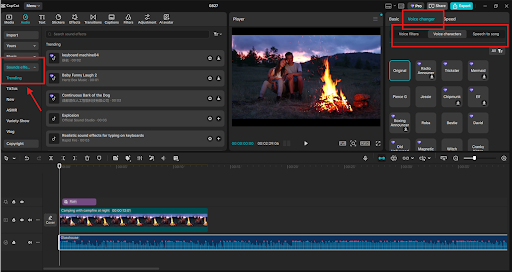
Now comes the fun part—changing your voice! Select the audio track you want to modify (this can be a recorded voiceover or the sound attached to your video). Go to Audio settings, and you’ll see the Voice Changer option. Browse through the available voice effects, such as:
- Chipmunk/High Pitch – great for comedic or playful scenes.
- Deep Voice – perfect for dramatic, mysterious, or villain-like tones.
- Robot Voice – adds a tech or sci-fi vibe.
- Echo or Distorted Voices – ideal for surreal or dreamlike edits. Click on each option to preview how it sounds before applying.
CapCut lets you experiment freely, so try different effects until you find the one that matches your video’s mood. Combine multiple effects in different clips for variety. For example, you can use a high-pitched voice for one character and a robotic one for another, all within the same video.
Step 3: Fine-Tune and Export Your Video
Once the voice effect is applied, it’s time to polish your project:
- Adjust Volume and Timing – Ensure your altered voice isn’t too loud or too quiet compared to the background music.
- Add Subtitles or Captions – Funny voices sometimes make speech harder to understand. Adding captions ensures your audience follows along.
- Include Sound Effects and Music – Layer in background tracks or effects to enhance the scene’s engagement. For example, a robotic voice with futuristic music sets the mood perfectly.
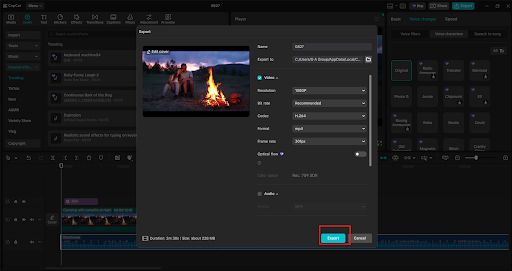
When you’re satisfied with the final product, click “Export” and save your video in the desired format. You can then share it directly to TikTok, YouTube, Instagram, or wherever your audience is. Short-form videos (15–30 seconds) with creative voice changes usually perform better on platforms like TikTok and Instagram Reels.
Creative Ideas for Using the CapCut Voice Changer
Now that you know how to use it, here are some fun ways to get creative:
- Comedy Skits: Act out a scene with multiple characters, each using a different voice effect.
- Gaming Clips: Add humor to game highlights by narrating them in a robotic or squeaky voice.
- Storytelling Videos: Use different tones for different parts of your story to make it more dramatic.
- Prank Videos: Surprise friends with unexpected voiceovers.
- Educational Content: Keep learning lighthearted by explaining concepts with playful voices.
Conclusion
The CapCut Voice Changer feature is more than just a playful add-on—it’s a creative tool that helps you entertain, connect with, and engage your audience. Whether you’re producing comedy sketches, narrating game clips, or simply adding personality to your vlogs, this feature makes it easy to experiment without technical skills or expensive equipment.